Building a Garden Arbor

Building a Garden Arbor: A Look at My Structure

Building a Garden Arbor: A Look at My Structure

In “Building a Garden Arbor: A Look at My Structure,” I’ll show you how a little bit of thought and planning can result in the addition of a super beautiful and highly functional hardscape feature to your own garden.  Have a read, and start planning your arbor!

By John G. Stamos

Table of Contents

Introduction to Building a Garden Arbor

It’s the dead of winter and cold as hell here in Michiana Shores.  So why am I writing about garden arbors now?  Two reasons.  First, I just finished building mine this last November 30th (because I screwed up and didn’t start actually working on it until the end of summer).  Second, if you want to end up with one of these fabulous hardscape structures in your garden this summer, winter is a great time to start planning for it.

You can come by a really beautiful garden arbor a few different ways.  For example:

  • You can hire others to design and build one for you. 
  • You can design and build it yourself.
  • You can pick an existing design (e.g., from a book) and build it yourself.

In this article, I’m concerned with the last two ways.  Since I designed and built my arbor myself (and since I’m still pretty fresh from finishing it up), I’ll sort of be looking at this topic through the lens of my own structure, and my experiences implementing it.  This one’s going down like this:  First, a clearing up of some terminology.  Second, a look at the design process.  Third, some pictorial highlights of my building process.

So, even though it’s winter (for those of us here in the Northern Hemisphere), the time is ripe for strapping on your thinking cap – not your tool belt just yet – and planning your garden arbor.  If you take your time and plan it right, and then (and only then) build it soundly and correctly, your arbor will be a focal point in your garden’s design, and will provide you with beauty and enjoyment for years to come.  If you try to wing it without doing any planning, and end up just throwing it together, it’ll look exactly like what elephant crap looks like.  But bigger.

Note to readers: This article’s long-ish.  (Ok, it’s long.)  I’ve written it in response to those of you who’ve been looking for pics of my completed arbor and a follow-up to what was essentially a “Part One” which I wrote here on The Renaissance Garden Guy a couple of months back.  There are lots of good pics in this one, and lots of pretty decent info.  And understand, as we get closer to spring and nice weather, I’ll be posting a series of extremely short “How To” articles, each concerning the various respective steps of my arbor’s construction.*  So as far as this article’s concerned, look at the pics you’re interested in looking at, and read what moves you.  Don’t feel obligated to bite off the whole chunk.  You won’t hurt my feelings.  I promise. 

Besides, if you do duck out early, how would I ever find out?

J.G.S.

*You can cheat and check out those short “How To” articles right now.  Click here to learn how to set structural posts for a garden arbor.  Click here to learn how to install a ledger board for a garden arbor.  And click here to learn how to install girders for a garden arbor.

Arbor or Pergola: Which Is Which?

When you decide to undertake the task of building a garden arbor, you’ll want to understand that sometimes two (or more) different words – spoken, written, or both – will probably be used to describe the same structure that you’re aiming to build.  If you Google the words “arbor” or “pergola,” you’re gonna find a bunch of different overlapping definitions and a bunch of different overlapping pictures.  Arbors are often called pergolas, and vice versa.  For the sake of this article, here’s my lowdown:

Arbor.  Can be freestanding or attached to a structure.  Has a vertical trellis component and a horizontal (top) open framework of outriggers (girders), rafters, and/or crossmembers (crossrafters).  Both the vertical and horizontal components of an arbor allow and encourage climbing vines to grow and spread.

Pergola.  Generally a freestanding structure with a least four vertical supports (legs) with a “roof” made up of an open framework of girders, rafters, and/or crossmembers (crossrafters).  A pergola is basically an outdoor “room” within which people can sit, stand, or walk in order to enjoy the outdoors.  It can be built in front of the entrance to a larger structure, such as a house.  Pergolas can also be built to accommodate climbing vines (in which case the differences between these structures and arbors become even fuzzier).

The way I like to think about the difference between arbors and pergolas is that arbors are for plants, and pergolas are for people.  Bottom line though, the terms are often used interchangeably.  Understandable.

In the pics below, you’ll find first the structure I designed and built this past year for my garden, from pressure treated pine lumber.  I define this structure as an arbor.  It’s got a substantial and clearly defined vertical trellis component (click here for more details about this part of the structure), and an open horizontal (top) structural framework consisting of 2×10 outriggers (girders), 2×4 rafters, and 2×2 crossmembers (crossrafters).  Overall, this structure is just under 30 feet in length and 10 feet in width.  At the point of its highest crossmembers, it’s just over 8 feet tall.  It’s designed to accommodate dense populations of climbing vines.

The next photo you’ll see is of a fabulous pergola designed and built by some wonderful folks in New Mexico whom I met on Twitter.  Their handle is No time like now!  Their tweets are great, their outlook on life is heartening, they live in one of the most beautiful places on earth, and they’re the nicest people.  Follow them on Twitter at @onlynow15.  They designed this structure themselves, and built it themselves from red cedar lumber.  It’s approximately 5 feet long, 3 feet wide, and 8 feet tall.  Note that its got four points of support, a floor (deck) for foot traffic, and it frames an entrance to a larger structure.  It can be viewed almost as an outdoor foyer, a beautiful space within which people can sit, stand, walk, or pass through to the adjacent doorway.  In terms of design, check out its fabulous form and detail, and its ingenious reference to its surroundings and the nearby structure.  In terms of construction, pay attention to the dado joinery of the vertical and horizontal support members and the overall quality of the assembly and installation.  This pergola is a true gem.  I absolutely love it.  Great job, you guys!!!

Building a Garden Arbor
My arbor structure incorporates a vertical trellis component, as well as three vertical support posts, and horizontal support outriggers (girders), and the open framework horizontal top. This structure was built to support climbing vines. Notice how the vertical trellis component extends north (left) beyond the "arbor section" of the structure. This is to accommodate vines which require full sunlight.
This beautiful pergola was designed and built by some talented and creative friends in New Mexico. It incorporates four vertical posts for support, two horizontal support girders, and six rafters. Its stunning design references its surroundings, and the quality of its construction is excellent.

Note:  From here on out, for the sake of convenience, I’m going use the term “arbor” to refer to both types of structure.

Planning Your Arbor: Design Is Critical

What Does an Arbor Do for the Look and Feel of a Garden?

Quite a bit.  These hardscape structures provide elevation and depth, thereby creating visual “texture” to the garden space.  They can compliment and enhance (or camouflage and minimize) the visual impact of an existing structure (in my case, my house).  And an arbor, with its trellis component, provides one of the two addends in that all-important garden equation of “ARCHITECTURE + SWARMING VINES = FRICKIN’ AMAZING.”  I’m a sucker for foliage growing wild all over stuff that humans build.  That whole “jungle-covered ancient ruins” thing is something I’ve gotta have in my garden.  

Building a Garden Arbor
My arbor's imposing size makes it a focal point in my garden space. It adds dimension to this area of the garden and covers a blank expanse of house.
Building a Garden Arbor
The open framework top provides an excellent matrix for climbing hydrangea vines. This structure will help achieve a "green tunnel" effect in this area of the garden.
Building a Garden Arbor
The vertical trellis component of my arbor structure encourages the growth of vines, in both sun and shade.

Building a Garden Arbor: The Design Process

A critical point to always keep in mind is the simple fact that building a garden arbor starts with designing a garden arbor.  Here’s my suggested design process:

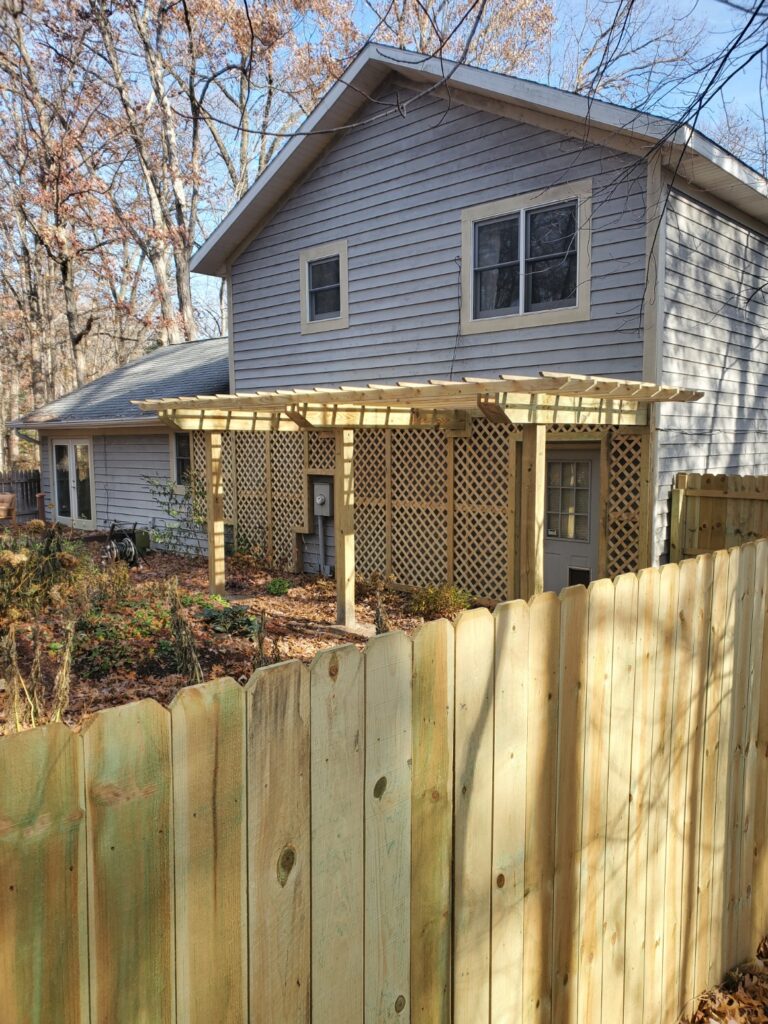
Imagine and Survey.  In order to end up with an awesome arbor in your garden, you’ve gotta first get it into your head.  I got my first whiff of an arbor idea when the overall design scheme for my garden slid into my head almost two years ago.  There was an existing, scant “pseudo-arbor” (in the basic location of my new arbor) at that time, and a corresponding ugly, blank expanse of house.  This bleak tableau formed a sizable portion of the eastern boundary of my garden.  I knew I wanted to change that.  Plus, I knew I wanted some vegetative height in that location, and I knew I didn’t want to achieve it with a tree.  I knew that a structure with heavy wooden posts, a trellis covering the house, and an open grid-like top engulfed by a swarming wall and canopy of flowering vines would fit the bill.  I could already see this thing in my head.  And that’s what you have to do.  Envision your future arbor.  Once I had my vision, I had to confront the reality of what my actual garden space was going to allow me to do. 

So, at that point, I looked at my available garden space, appraised its general topography, and paid close attention to the amount of sunlight each part of the garden received.  How much space you have to work, the lay of your land, and sun exposure are super critical factors.  They’ll ultimately determine what you can and can’t do in your garden in terms of building a substantial hardscape feature like an arbor. 

Once I knew what I wanted to achieve with my future arbor (both visually and functionally), and after taking space, terrain, and sunlight into consideration, the essence of my future arbor began to form in my head.  The takeaway here is: think about what you want your arbor to do and how you’d like it to look, and acknowledge what the existing conditions in your garden space will, and won’t, allow you to do.

Of special note: In the case of my structure, I knew what types of climbing vine I wanted to grow, so I knew what kind of surface detail I needed to implement when I designed my structure.  Make sure to research the methods your future vines will utilize to attach to and climb trellises and arbors.  For example, Clematis vines use their relatively short aerial leaf stems to attach themselves to vertical climbing structures.  They can only wrap these short stems around comparatively thin/narrow members (probably not much more than 1/4 to 1/2 inch in diameter).  So if you’re planning an arbor for Clematis vines, you’ll design it utilizing slender climbing components.  Know what kind of structure and surface your climbing vines will require to actually climb, and incorporate this info into your design.

The Design: Work From a Plan.  Once the concept for your arbor is in your head, you can take one of two routes.  You can design one yourself.  Or, you can look at existing designs (with corresponding construction drawings/plans/instructions) and select one that suits your wants and needs, and field conditions.  I took the first route.  But whichever route you decide on, the critical, all-important point here is a very simple one: You absolutely need to work from a drawing/plan.*

*Building a garden arbor is no different from building other types of garden structures in terms of requiring the use of a drawing to guide your construction process.  Click here to read “Building a Support Structure for a Container Trellis” to see how even the simplest of drawings makes the building process of any type of garden structure virtually foolproof.

Note:  For the sake of simplicity, I’ll refer to any architectural construction plans or drawings as “drawings” for the remainder of this article.

  1. Design your own.  Again, this is what I did.  Since I possess (very) rudimentary drafting skills, I was able to make a passable set of working drawings of my structure.  I completed these after assessing and measuring all existing field conditions.  This being said, I can guarantee one fact: it doesn’t matter how good your drawings are, there’s always going to be something that arises as a result of what’s actually going on with your construction site that requires an adjustment or revision to your drawing.  Make your changes on the drawing (not just in your head) and proceed from there.  Finish your structure in accordance with the revisions you’ve made on your drawing.  It’s way easier to keep track of measurements and dimensions this way.  (In construction parlance, your revised final drawings – the ones you finished building your arbor with – are now considered “as-builts.”)  After you’ve built your arbor, hang on to your original drawings and your as-builts, and respectively (and clearly) label them as such.  If you ever need to re-work your structure, these drawings will really come in handy.
  2. Use an existing design.  There are lots of sources for existing arbor designs available to the public.  There are downloadable sets of working drawings.  There are periodical publications and books dedicated to the construction of outdoor and garden structures, filled with arbor ideas and designs, with corresponding instructions and drawings.  I’ve known several people who garden and who’ve utilized excellent designs and drawings from books to build awesome garden structures.  After determining what would work best for their respective gardens, they built beautiful structures per the designs and drawings they selected from these books.  Again, your own specific field conditions will probably require at least one or two minimal adjustments to any of the drawings you find in these books.  Just as above, note and record any changes you make.  This will help you keep things straight during construction, and will be beneficial if you need to make any changes to your arbor down the road.

There are two books available from Amazon which I highly recommend to those of you who want to tackle an arbor project but don’t want to screw around with self-designing.  Although I don’t own copies of either of these books, I’ve examined both of them closely in the past.  They’re great books with great designs, comprehensive instructions, practical suggestions, clear pictures, and sound drawings.  Each one is loaded with great ideas and the concise (and easy to understand) information necessary to implement them.  Again, I recommend both of them to anyone considering building a garden arbor.  You can check them out right here by clicking on the icons below.  At the very least, these books are excellent for the really great ideas you can pick up from them.

Trellises & Arbors: Over 35 Step-by-step Projects You Can Build, from Sunset Books.  This is a really terrific book with lots of beautiful ideas for arbor and trellis structures.  I wish I had a picture of the book to include here, but my memory of its excellent content is the best I can do right now.  What I remember most about it was the fact that it has really easy to follow instructions with excellent pictures.  These can be used “as is” or can be easily adapted to fit the conditions in your garden.  An excellent book with lots of great ideas for building a garden arbor.  Click the #advertisement link to learn more, or to order it here, directly from Amazon.

Trellises & Arbors: Over 35 Step-by-step Projects You Can Build, from Sunset Books

Click here to learn more or to order

#advertisement

Trellises, Arbors, & Pergolas: Ideas and Plans for Garden Structures, from Better Homes & Gardens.  This is an awesome book.  Although it’s been years since I’ve seen it, I remember it had loads of ideas and a lot of actual construction drawings to go along with them.  I would feel totally comfortable building an arbor from any number of the designs and drawings I’d seen in this book.  Again, all I’ve got are my memories of this book’s excellent content.  Sorry, no pic.  But again, this is a great book with great ideas and excellent detail.  I wholeheartedly recommend this book (and the previous one) to anyone who’s planning on building a garden arbor of his or her own.  To learn more, or to order it here, conveniently and directly from Amazon, please click the #advertisement link.

Trellises, Arbors & Pergolas: Ideas and Plans for Garden Structures, from Better Homes & Gardens

Click here to learn more or to order

#advertisement

Building a Garden Arbor
The mitered ends of all horizontal members - outriggers (girders), rafters, and crossmembers are all have the same degree of miter, creating a visual consistency and"flow" for all of these "top" elements.
Detail is important, even for the mitered ends of these crossmembers, which face the side of the house.
Building a Garden Arbor and Trellis
The horizontal trellis component of this structure is designed to assist dense vines in covering and minimizing the side of the house and corresponding electrical and mechanical distribution components.
Building a Garden Arbor
The heavy 6x6 support posts lend a sense of architectural gravity and permanence to my structure.

Building a Garden Arbor: Construction

Since, in the coming months, I’m going to be publishing a series of short “How To” articles highlighting the individual steps involved with building my arbor, I’m not going to bore you with any more details.  Instead, I’m just going to show you some pics of how this thing came together.  Hopefully, you’ll be able to get a feel for what’s involved on the construction end.  With the exception of about sixteen hours (over the course of two working days) when my friend Zen worked with me, I built this whole thing by myself.  So it’s safe to say that I’m pretty familiar with all aspects of its construction.  I tried to give you shots that highlight the basic “phases” involved in building it.  The pics have really short, descriptive captions.  Have a look.

You’ll also find a few recommended products scattered among the pictures.  Whether it’s a tool or a type of building material, every single product you see here is one I’ve used and highly recommend.  If anything interests you, click the corresponding Amazon #advertisement link and check it out.  Building a garden arbor safely, correctly, and efficiently means using the right tools.  This fact is critically important.

Had to demolish and remove this before installing my new arbor.
Building a Garden Arbor
2x4 "Deadmen" supporting soon-to-be-demolished old boards, and temporary lapped 2x4 stringers, allowed me to set locations and elevation for my new heavy posts .
How to Set Structural Posts for a Garden Arbor
My friend Zen excavating one of the 5' deep by 2' diameter post holes. Zen helped me for two days with setting the 12' long 6x6 posts and installing the 2x6 ledger board along the length of the house.
the 6x6 post lumber.
How to Set Structural Posts for a Garden Arbor
Posts installed. It took Zen and me 8 hours to excavate and set these. The soon-to-be-demolished old ledger board is visible in the background.
Zen and me. Zen's the young, handsome guy on the left.
I had to build two of these stages in order to work over existing plantings without damaging them.
Building a Garden Arbor
Old structure entirely demolished.
How to Install a Ledger Board for a Garden Arbor
Here, Zen and I are installing the new ledger board. We used three 10' long, 2x6 boards and lag-screwed them into the studs framing the house.
How to Install Girders for a Garden Arbor
Installing the outriggers (girders). These are 10', 2x10 boards trimmed in length by just a few inches. The miters are open 125 degree cuts (boards flipped and cut at 55 degrees).
How to Install Girders for a Garden Arbor
The extension of the outriggers, or girders, from the ledger board to beyond the heavy support posts will create an attractive cantilever effect for the completed arbor.
Two outrigger boards "sandwich" each post, and are each fastened with four countersunk 3/8-inch galvanized lag screws.

Makita 18-Volt 2-Amp Lithium Ion Brushless Cordless Driver/Drill/Impact Driver Set.  I use this awesome Makita driver/drill/impact driver set for everything, including – you guessed it – building a garden arbor.  This kit also comes with a powerful impact driver, which is helpful when dealing with tightly threaded nuts and bolts, and tough threaded fastener penetration situations.  This is a great rugged combo by a matchless manufacturer of cordless drills and drivers.  I’ve used Makita cordless drills/drivers my whole adult life.  To learn more, or to order this great set here, directly from Amazon, please click the #advertisement link.

Makita 18-Volt 2-Amp Lithium Ion Brushless Cordless Driver/Drill/Impact Driver Set

Click here to learn more or to order

#advertisement

This is my own Makita 18-volt 2-amp lithium ion brushless and cordless driver/drill/impact driver set. The first name in cordless tools, my Makita set is an older version of today's model. It's got exactly the same specs, however, and operates just like new. This is an absolutely essential set for me.
Plugging the countersinks with short sections of wooden dowel soaked in sealer and glued in place with waterproof wood glue.
The dowel plugs create a "pegged" appearance.
Building a Garden Arbor
Beginning the vertical framework for the trellis component of the arbor structure. The 2x4 studs are anchored in concrete...
...and fastened to the ledger board and/or an outrigger at their tops.
The framework is extensive.
Building a Garden Arbor and Trellis
Completing the trellis framework was time consuming and challenging.
"Stand-offs" were installed to achieve "floating" effects for certain sections of the trellis.
Building a Garden Arbor and Trellis
Cutting the pre-fab lattice panels to fit. I used my Skilsaw 7-1/4" worm drive saw to make all of the panel cuts.
Building a Garden Arbor and Trellis
Clamping and fastening the lattice panel sections to the supporting framework.

Skilsaw 15-Amp 7-1/4” Worm Drive Circular Saw.  My Skilsaw 15-Amp 7-1/4” Worm Drive Circular Saw is one of the most versatile saws available.  It’s incredibly powerful and very lightweight, and it can be used in a huge variety of cutting applications.  I couldn’t have built my garden arbor and trellis structure without this iconic piece of equipment.  To order yours here, directly from Amazon, or to learn more, please click the #advertisement link.

Skilsaw 15-Amp 7-1/4″ Worm Drive Circular Saw

Click here to learn more or to order

#advertisement

My own Skilsaw 15-amp 7-1/4" worm drive circular saw. This incredibly powerful and versatile saw is truly a carpentry icon. My saw is an older version of today's model, but it has exactly the same specs and it works just as beautifully as it did when it was brand new.
Building a Garden Arbor and Trellis
The pleasing appearance of this custom trellis will soon be obliterated by dense, climbing greenery.
Building a Garden Arbor
Installing the 2x4 rafters on top of the outriggers (girders).
Each rafter was measured, marked, pre-drilled, and pre-countersunk. Each was then through-screwed from the top into the girders.

GE Supreme Silicone Sealant.  This is a matchless, 100% weatherproof silicone product that’s water and rain resistant within 30 minutes of application.  If you’re going to be building a garden arbor, you’re going to need exterior caulk.  Make sure that this is the one you pick.  It’s by far the best exterior silicone caulk I’ve ever used.  Click the #advertisement link to learn more or to order it here, directly from Amazon.

GE Supreme Silicone Sealant

Click here to learn more or to order

#advertisement

One of my tubes of GE Supreme Silicone Sealant. Locked and loaded. This is the best silicone caulk product I've ever used.
The countersinks are sealed with silicone to prevent the entrance of water and potential splitting.
Chalk lines were snapped to mark the exact placement locations for all rafters and crossmembers.
Building a Garden Arbor
The evolving "matrix" of rafters and crossmembers.

Pony 8” C Clamp.  This clamp is a must-have for any woodworking project.  Time-honored and jobsite-proven, Pony is the best name in clamping products.  I used these awesome clamps throughout the entire process of building my garden arbor.  Learn more, or order these legendary clamps here, directly from Amazon, by clicking the #advertisement link.

Pony 8″ C Clamp

Click here to learn more or to order

#advertisement

A pair of my own Pony 8" C Clamps (along with another awesome Pony product - a powerful 3" spring clamp). Pony clamping products are a jobsite must.
Each 2x2 crossmember was installed in two pieces, and square-butted and toe-screwed together to form one long board. The relatively low visibility factor from the ground allowed for this simple but effective joinery method.
Detail of the square-butt point for a crossmember length.
Building a Garden Arbor
Interesting view of the top of the arbor.

Building a Garden Arbor: The Wrap-up

Enough already!!!

Now that I’ve inundated you with more information than a standard hard drive can store, are you thinking clearly enough to even know if you want to build an arbor?  Are you even still awake?  Sorry about that, but I wanted to get you good info and pics, and oblige those of you who’ve been asking for shots of my arbor and the story behind it.  And I wanted to give you a few suggestions in the (hopefully not now unlikely) event that you want to build an arbor in your own garden.

So you’ve got my take on distinguishing between an arbor and a pergola, and you’ve got my structure, and the really gorgeous one my friends in New Mexico designed and built, as an example of each, respectively.  You also now know my thoughts on the design phase of one of these structures: Think about what you want, make sure your idea will work in your garden (and with the vegetation you’d like to see growing on it), and come up with a working design (in the form of a plan, or drawing).  And you come up with that design either on your own, or by using one that someone else came up with.  And once you check and double-check your design, and you make any adjustments you need to make to the drawing you’re going to follow to build your structure, you can quit wasting time listening to me and get your ass in gear and build your arbor!

Best of luck! 

Cheers, and Happy Gardening (and building)!

The Renaissance Garden Guy is a participant in the Amazon Associates Program.  As an Amazon Associate, I earn from qualifying purchases.

Additionally, The Renaissance Garden Guy is a participant in the Bluehost, SeedsNow, and A2 Hosting affiliate programs.  I earn a fee/commission each time a visitor clicks on an ad or banner on this site from one of these companies and makes a subsequent qualifying purchase.

Please click here to view The Renaissance Garden Guy Disclosure page.

14 thoughts on “Building a Garden Arbor: A Look at My Structure”

  1. That is amazing. Thank you for all those spectacular pictures. I guess the good looking guy with the hat must be you. 🙂 🙂 🙂

    1. Thank you for giving this one a read, Annie, I really do appreciate it, and I’m so glad you’ve enjoyed it. It was a sizable project and I was glad to finish it, and was satisfied with the result. As for your assessment of yours truly, I think you may need to adjust the resolution on your screen! You are far too kind, Annie! Thanks once again!

    1. I feel the same way! Although I did put quite alot of effort into designing and building it to look good, I’ll be happy when it gets swallowed up by vines!

    1. Thank you for saying so. I’m glad the process was easy to understand. In the coming months, I’ll be writing a series of really short articles with simple instructions for each element of the structure. Thanks for your interest.

  2. Your arbor looks great! With all the design and construction work involved it’s amazing that you were able to get it built in such a short period of time. You and Zen look like professionals.

    1. Thank you, Kevin. I’m glad you like the looks of this thing. Zen was a huge help for those two days, for sure – I couldn’t have done it without him. Designing this thing was engaging and relaxing, and it satisfied my creative impulses. Actually building it… well, that was definitely work!

  3. Sharon Lee Johnson

    Great information for everyone. I enjoyed the whole thing. Even if I will not be building . You can never get to much knowledge. I love your Arbor!! And I am so excited to see it covered with green!! Spring can’t get here fast enough for me! I long to enjoy the flowers and trees!! Thank you!

    1. Thank you, Sharon – very much appreciated! I’m so glad you found the piece interesting. And your wonderful support of my efforts means the world to me. Like you, I’m really excited to get my vines growing on this thing – thanks again!

      1. Sharon Lee Johnson

        Your very welcome! I enjoy reading and seeing the progress! Makes me always look forward to the next step in your beautiful garden. 😊

          1. Thank you so much, Sharon! The vines are getting bigger and they’re really starting to cover the trellis section. It should really start looking good next spring and summer! Thanks again, Sharon!

Leave a Comment

Your email address will not be published. Required fields are marked *

This site uses Akismet to reduce spam. Learn how your comment data is processed.

You cannot copy the content of this page.