
5 Great Bulbs for Fall Planting
Searching for ideas for some great bulbs for fall planting? Look no further! These old standbys are reliable as clockwork, super easy to plant, even easier to care for, and are true garden beauties.
By John G. Stamos

Greetings, gang, and welcome back. Today, the topic is great bulbs for fall planting. This is a particularly relevant discussion to have now here in my hardiness zone of 5B/6A because winter is just around the corner, and before long, the ground will be frozen solid and unamenable to any planting and bedding ideas one might be entertaining. So, let’s get while the gettin’ is good and start this show right now. All of the 5 bulbs that I’m recommending as being great for fall planting are indeed exactly that: hardy, simple to plant and care for, and beautiful once they’ve emerged and begun to leaf out and bloom. Here you go…
1. Snow Crocus (Crocus chrysanthus)

The basics.
Plant family – Iridaceae (includes such other genera as Iris, Gladiolus, Freesia, etc). Height – 3″-4″. Spread – 2″-4″. Light – full sun to partial sun. Bloom color – bright shades of white, yellow, purple, and blue. Bloom time – late winter to early spring. Foliage – slender, deep green with a sivery white stripe running lengthwise down each leaf, and herbaceous. Hardiness – zones 3-8. Growth rate – slightly slow to medium growth rate. Pollinators – although they ususally bloom before any pollinators are active, I do sometimes see a brave bumblebee or two paying them a visit during the cold weather. Toxicity – all parts of the snow crocus are toxic. Pest resistance – generally excellent. Deer usually ignore them, but voles and chipmunks might dig the corms up. Because of their toxicity, these critters don’t eat them, but I’ve heard stories of these critters unearthing them (without any damage to the corms, or the rodents). It’s definitely best to take precautions and protect them when you’re planting. Click here to read my article from 2022, “Protect Your Plants from Voles and Chipmunks.” Use the techniques discussed there when bedding your bulbs and corms and you won’t go wrong.
Notes from the field.
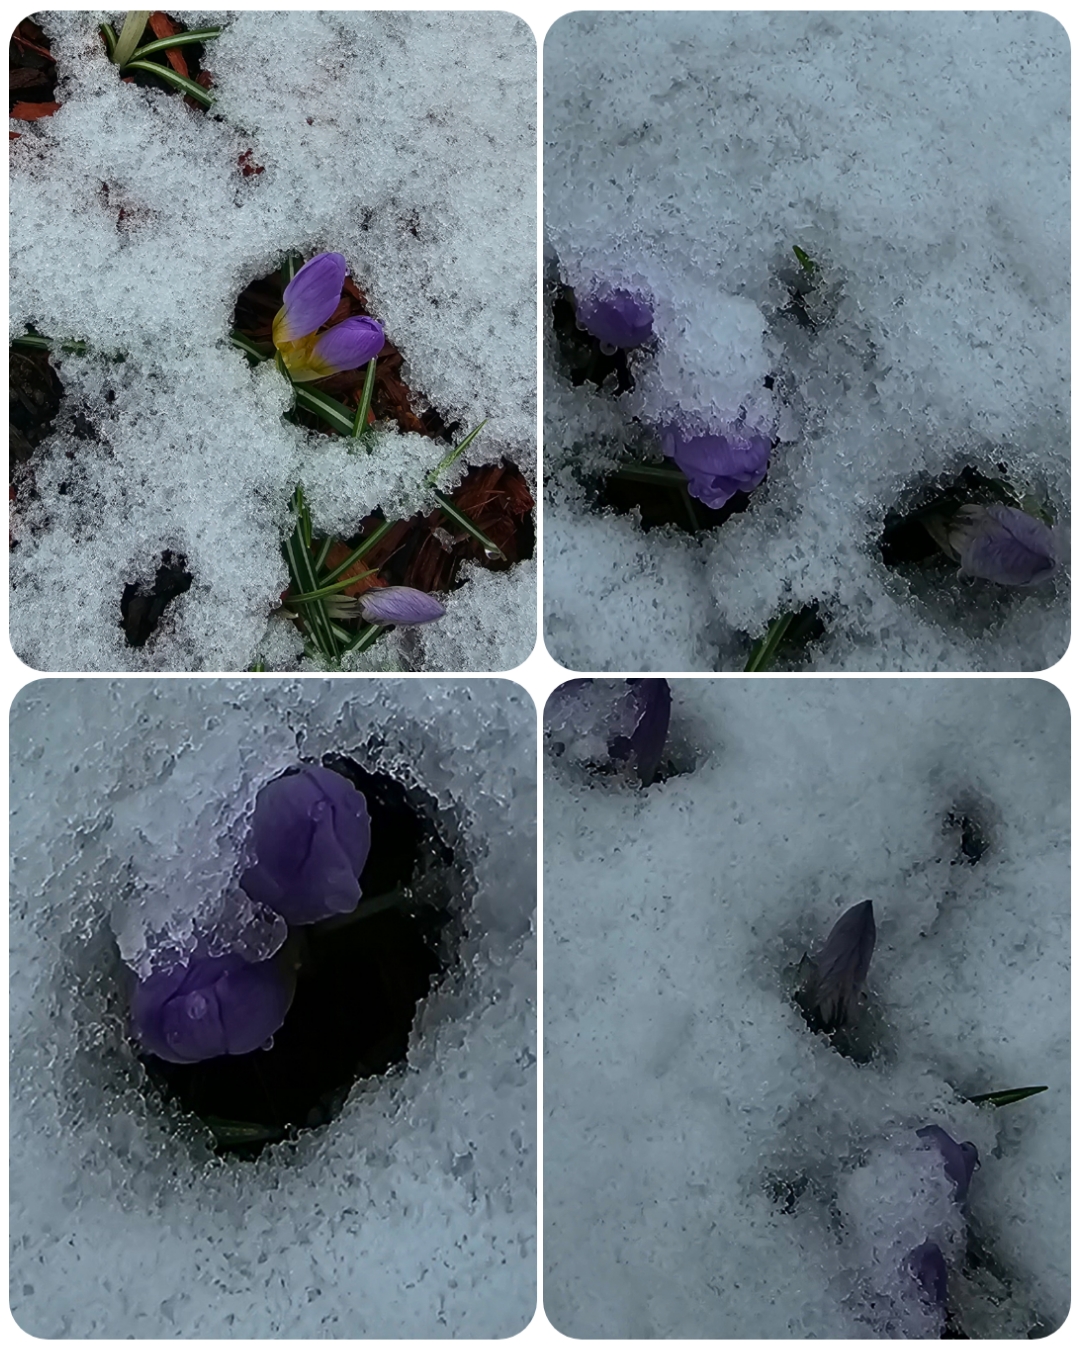
When I was considering which plants I wanted to include in my Top 5 list of great bulbs for fall planting, I sort of cheated when I decided to include the amazing and beautiful snow crocus. Snow crocuses don’t grow from actual bulbs – they grow from something called a corm. Unlike bulbs, which are actually short stems that form either thick, fleshy leaf bases (scales) or papery membranous “tunics” that enshroud the bulb and function as the dormant plant’s energy “storage units,” a corm is a smooth, rounded and swollen underground modified stem which stores energy for the dormant plant within the actual stem structure itself. (Click here to read this informative, short article outlining the differences between corms and bulbs.) Like plants that grow from bulbs, crocuses spread via corm offsets (known as cormels) which produce complete new crocus plants. My crocus colony has gradually spread since first planted to fill in a formerly barren section of my garden’s “Blue and White Hill” planting feature. Although they do reliably and gradually spread, they’re not even remotely aggressive or invasive. Along with my hellebores, my snow crocuses are the first plants in my garden to bloom each year. There’s really something heartening about seeing a bluish-purple and white flower peeking through the snow in February. What’s even cooler is the fact that these little blooms close up tightly at night only to fully open again in the sunlight of the next day.
Suggestions for planting snow crocuses.
Plant snow crocus corms as soon as you get them. Fall is the absolute correct time to plant snow crocus corms. Since crocus corms are readily available from most online nurseries, and those same nurseries ship them in the fall, this all works out pretty well. If you get them at this time of year, it’s always best to get them in the ground right away. They can, however, be successfully stored in a refrigerator, or other cool, dark, dry locations until you’re ready to plant them. When planting snow crocus corms, they should be situated about three times as deep in the soil as they are tall. My prins claus snow crocus corms were approximately 3/4″-1″ in length, so I bedded them about 3″ deep, then added a layer of mulch over the soil. I planted several approximately 4″-5″ apart.
Soil. My crocuses grow beautifully in the soil in which they’re bedded. This soil is well-drained, and varies – at least throughout the section of the garden where they grow – in terms of soil pH. Some individuals are in slightly alkaline soil, some are in slightly acidic soil, and some are in neutral soil. In all cases, these crocuses are healthy and flourishing. My own observations tell me that these plants are not choosy about soil pH. Soil drainage, however, is important. No bulbs or corms – including crocuses – will survive long in soggy, saturated conditions.
Water. My crocuses evidently derive enough moisture from the surrounding soil in late winter and early spring to be happy. Since they sprout and grow and bloom in frigid temperatures long before any garden hoses can be connected, the amount of moisture provided them by Mother Nature alone is enough to keep them happy.
Pruning and/or deadheading. Nope.
Companion planting. My crocuses grow amicably among iberis, muscari, campanula, veronica, and salvia. Although they begin flowering before any of these others do, there can be some bloom overlap, particularly in the case of the iberis. In any case, there’s no adverse impact caused by the proximity of these plants to one another.
When Is a Crocus not a Crocus?
Sometimes a crocus isn’t really a crocus. And sometimes it is. Here’s the deal. Snow crocuses, also known as winter/spring-flowering crocuses, bloom in late winter and early spring throughout the USDA hardiness zones in which they grow. They’re the most widely known and sought after crocus species. Snow crocuses, which are true crocuses, are unrelated to a certain popular plant known as the autumn crocus (Colchicum autumnale), which is not a true crocus at all. The two plants have a very similar appearance, but are of two different families and genera. The genus Crocus (true crocuses) belong to the family Iridaceae, and the genus Colchicum (autumn crocuses) are part of the family Colchicaceae. In terms of physiology, true crocuses are cold hardy to lower temperatures than these autumn crocuses, and snow crocuses and autumn crocuses do their thing at different times of the year, as their names suggest. Like the snow crocus (true crocus), the non-crocus autumn crocus has leaves that emerge in the spring and die back later in the spring and into early summer. But, unlike the snow crocus, this plant sends up flower stalks, and subsequently blooms, in autumn. Colchicum grows taller than the true crocuses and has a slightly different flower structure (six stamens for Colchicum and three for crocus flowers).
Confused yet? Don’t worry. You will be soon.
There’s another autumn crocus. A real one this time. That’s right, Crocus speciosus is “the other autumn crocus.” It’s a true crocus that flowers in the fall, just as its non-crocus namesake does. But since it’s the real deal, it shares the same flower structure with its cousin, the snow crocus. This autumn crocus isn’t as well-known as either its non-crocus namesake, or its true crocus winter/spring-blooming cousin.
Confusing, right? It doesn’t need to be. All you need to know is this: if you want great bulbs (or corms, in this case) for fall planting that’ll give you beautiful flowers a few months later, usually with snow still covering the ground, snow crocuses are the way to go.


2. Grape Hyacinth (Muscari)

The basics.
Plant family – Asparagaceae (includes such other genera as Asparagus, Agave, Hyacinthoides, Scilla, etc). Height – 4″-8″. Spread – 2″-4″. Light – full sun to partial sun. Bloom color – shades of blue and white. Bloom time – April-May in zone 5B/6A. Foliage – deep green, strap-like, and herbaceous, and growing directly from the bulb. Hardiness – zones 4-8. Growth rate – medium growth rate, but prolific naturalizers. Pollinators – bees and butterflies. Toxicity – all parts of the grape hyacinth plant are acutely toxic. Pest resistance – excellent deer and rodent resistance.
Notes from the field.
Grape hyacinths, as a group, are made up of approximately 30 different species within the genus Muscari. In spite of their common name, they’re not true hyacinths. These plants grow from actual bulbs, and are substantially toxic to would-be mammalian grazers, hence their excellent pest resistance. In my garden, grape hyacinths (I grow a few different species/varieties together in drifts throughout my “Blue and White Hill” planting feature) are effective naturalizers. One species in particular, Muscari armeniacum, is extremely proficient at spreading. Mine have spread via bulb offsets, as well as through self-sowing. To minimize invasiveness, I remove spent flower heads when each plant finishes blooming. This eliminates, to a great degree, the self-sowing component of this genus’ ability to quickly naturalize. When I remove the flower heads, rather than cutting the flower stalks (which remain green after the blooms are spent), I instead pull upward along each flower stalk and “rub” the dried seeds off with my fingers and collect them before they have a chance to reach the soil. I leave each green stalk intact, as it continues to provide food and energy to its bulb.
By midsummer, grape hyacinth foliage and flower stalks are usually ready to be cut back, but I like to leave these structures in place until I no longer see any green. In this way, I’m guaranteeing that each bulb has obtained maximal feeding and energy storage. Although grape hyacinths are famous for sprouting and blooming in early spring, mine routinely sprout in the fall. Depending on how cold temperatures drop over the winter, that foliage will either remain evergreen and persist into the following spring, or it will be zapped by super-cold, subzero winter temps and re-sprout in the early spring. I’m never surprised by anything that these assertive little plants come up with.
Grape hyacinths are beautiful little naturalizers and are deservedly in my Top 5 great bulbs for fall planting.
Suggestions for planting grape hyacinths.
Plant grape hyacinth bulbs as soon as you get them. If you buy grape hyacinth bulbs from a reputable online nursery (I recommend doing this), you’ll get them in the fall. If you can’t immediately get them in the ground, you can store them in your fridge for at least a couple of weeks. As with all true bulbs, plant them with the growing tip (the pointy side) up and flatter side (root crown base) down. Usually, you’ll see some roots poking out of the flat side. But if you’re unsure which side goes up, and which goes down (hey, it happens), plant the bulb on its side. I planted my grape hyacinth bulbs at a depth of about 3″, and a few inches apart. Once planted, I covered the soil with a layer of wood chip mulch. In terms of planting location, grape hyacinths are perfect front border/walkway liner/rock garden citizens. As long as their intended location will provide them with at least partial sun, they’ll do beautifully there. (You’ll read more about bulb structure and bulb planting orientation a bit later in this article.)
Soil. My grape hyacinths, like members of my snow crocus colony, grow beautifully in soil that ranges from slightly acidic to slightly alkaline. They seem indifferent to slight variations in pH level. As is the case with other bulbs, these cannot tolerate soggy conditions. The soil in which they grow must be well-drained.
Water. As these plants prefer moist, well-drained soil, it’s best to water regularly. This particularly holds true during the time that they’re growing, leafing out, setting buds, and flowering. Although they appreciate consistent watering during this period, once they’re established, they’re drought-tolerant.
Pruning and/or deadheading. Remove spent flowers and seed heads as I described above, leaving green flower stalks in place until they yellow. The same holds true for the foliage: once it yellows and begins to die back, cut it down to the ground.
Companion planting. My grape hyacinth colonies are situated in my “Blue and White Hill” planting feature, where they grow among populations of primula, echinacea, veronica, salvia, achillea, and shasta daisies.


3. Oriental and Asiatic Lilies (Lilium orientalis and Lilium auratum)

The basics.
Plant family – Liliaceae (includes such other genera as Fritillaria, Erythronium, Tricyrtus, etc). Height – 14″-greater than 72″. Spread – 6″ -12″. Light – full sun to part sun. Bloom color – various. Bloom time – mid/late spring through early fall. Foliage – deep green and herbaceous. Hardiness – zones 3-9 (Orientals) and zones 4-9 (Asiatics). Growth rate – moderate. Pollinators – bees, butterflies, moths, hummingbirds. Toxicity – all parts of the lily plant are acutely toxic to mammals. Pest resistance – lilies are generally robust and resistant to assault by mammalian pests because of their toxicity. Mine have never been bothered by burrowing critters like voles and chipmunks.
Notes from the field.
I grow my Oriental and Asiatic lilies in one big, tropical-looking patch along with daylilies (which aren’t lilies at all) and a couple of varieties of really attractive groundcover. Sadly, my erstwhile trumpet lily (Lilium longiflorum) and its offspring (bulb offsets) are no longer with me. I love the look of these plants sharing one, sizable patch, and prefer this presentation to a border application (as many of these plants are used). The feature has a wild, tropical vibe going for it, and it’s a focal point in my densely planted cottage-meets-zen-style garden. Once lilies become established, they require very little maintenance. I’ll outline below a few of the general lily-planting and growing practices that I use to keep mine going strong, but I do suggest a read of my 2021 RGG article, “Lilies: The Renaissance Garden Guy Way,” for a really extensive lily planting and growing tutorial. Everything from lily biology, to planting feature design and implementation, to ongoing lily care (including some great instructions, with accompanying pics, for deadheading/pruning lilies) can be found in that article. But for right now, here are some planting pointers regarding a plant genus that’s extremely high on my Top 5 great bulbs for fall planting list.
Suggestions for planting Oriental and Asiatic lilies.
Plant lily bulbs as soon as you get them. Lily bulbs – those of both Oriental and Asiatic species and varieties – are typically made available to gardeners for planting in the very early spring and in the fall. I think fall is the absolute best time for planting lily bulbs. Here’s why. Fall-planted lily bulbs, bedded at the correct time for a particular hardiness zone, will have enough time to establish important root development before the ground freezes solid, and the bulbs themselves will acclimate to their new spot in their planting bed during the 25 weeks or so of stratification they’ll experience over the late fall, winter, and early spring. If you opt for early spring planting, your lily bulbs will come up without the benefit of more significant root development and a half year of soil acclimation under their belts. Trust me on this one. I’ve planted lily bulbs in both the early spring, as well as in the fall in my 5B/6A soil. Although my spring-planted bulbs did eventually perform beautifully, the fall-planted lily bulbs generated faster growing plants that reached their flowering potential much more quickly than did their spring-planted counterparts, and the plants themselves were taller, and more robust and floriferous (at least for their first growing and blooming season). If you have the option, plan to get your lily bulbs in the fall and plant your lily bulbs in the fall. Lily bulbs really are great bulbs for fall planting. This one’s a no-brainer, guys and gals.
If necessary, you can store your lily bulbs in a cool, dry place – your refrigerator is perfect – for a few weeks before you plant them. It is, however, always best if you can get them in the ground as soon as you get them. And whether you plant your lily bulbs in the spring or fall, plant them at a depth of about six inches. I plant mine at this depth and add a layer (1″-2″) of wood chip mulch on top of the soil. This formula works perfectly for my lily bulbs. Pay attention to each plant’s projected spread and space the bulbs accordingly.
Soil. My lilies perform beautifully in slightly acidic soil. The pH of the dirt in their lily patch ranges generally from 6.5 to 6.8. And although they’re incredibly drought-tolerant once they’re established, they really appreciate moist soil, as long as it’s well-drained. Below the thousands of cubic yards of soil I imported and installed in my garden (for purposes of initially bedding my plants way back when) lies a substrate of sand. This means that the soil in which my lilies grow is very well-drained.
Water. As these plants prefer moist, well-drained soil, it’s best to water regularly, at least until the plants are established, and particularly during the period in which they’re growing and flowering. Once established, lilies don’t need tons and tons of water because they’re really drought-tolerant. If your soil doesn’t drain well, don’t overwater. Almost nothing will kill a lily bulb faster than forcing it to stew in soggy soil. Make sure to give your lily bulbs a decent drink when you first plant them – moisture in their soil is good for them and will encourage root development. Just make sure to adjust the amount of water you supply in accordance with their soil’s ability to drain. If you’ve got a sandy substrate, the soil will drain nicely, so you can give them a good shot of water. If your ground is basically clay, do not over water. Again, continuously soggy soil will kill your lily bulbs.
Pruning and/or deadheading. Yep. You’ll definitely want to do this. With plants that grow from bulbs (like lilies), you’ll want to ensure that those bulbs – which are these plants’ energy “storehouses” – get as much energy delivered directly to them as the green aerial parts of the plant can obtain from the sun during the spring and summer months. The bulb will put all of that stored energy into the production of more growth and more flowers for the plant the following year. When a particular lily’s flowers become spent, and the petals drop off, what remains are bulbous green seed pods. You’ll want to cut all of those off. This is because seed production requires massive amounts of the plant’s energy – energy which would otherwise be delivered to its bulb for use in the following year’s growth and bloom production. By cutting the seed pods off and halting the plant’s seed production, all of its energy will be diverted to its bulb for awesome green foliage and astounding blooms for the next spring and summer. At the end of their growing season, lily stems and foliage begin to first yellow, then turn brown and wilted. At this point, cut them down to the ground. Spring will be back before you know it, and you’ll see them again.
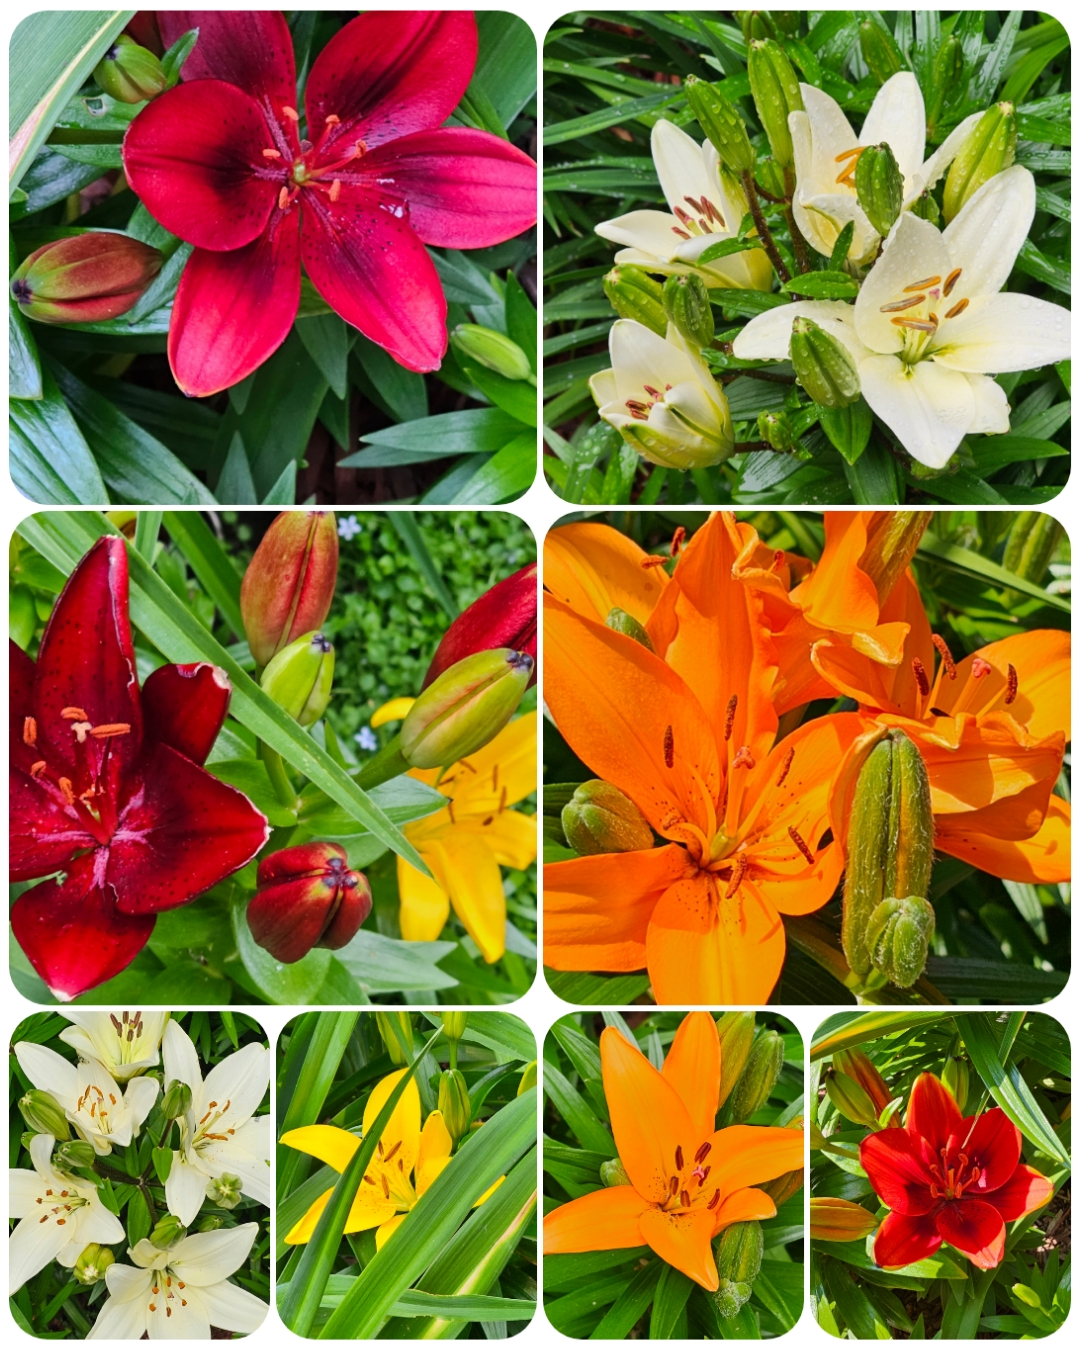
Companion planting. My Oriental and Asiatic lilies grow together in equitable fashion, and complement each other beautifully. They share their patch with a number of naturalizing daylilies and two amazing varieties of groundcover. I really love the consistency of theme in this feature, but truthfully, Oriental and Asiatic lilies look beautiful when sharing space with virtually any other ornamental perennial plant. They’re strong of character, unmistakable in appearance, and amazingly adaptable. They look great wherever their planted, and they get along beautifully with whatever neighbors you choose for them. Great bulbs for fall planting? You’d better believe it.
Please make sure to visit the “Lilies” image gallery right here on The Renaissance Garden Guy to check out all of my Oriental and Asiatic lilies doing their thing over the last couple of growing seasons.


Planting Bulbs: Which End Is Up?
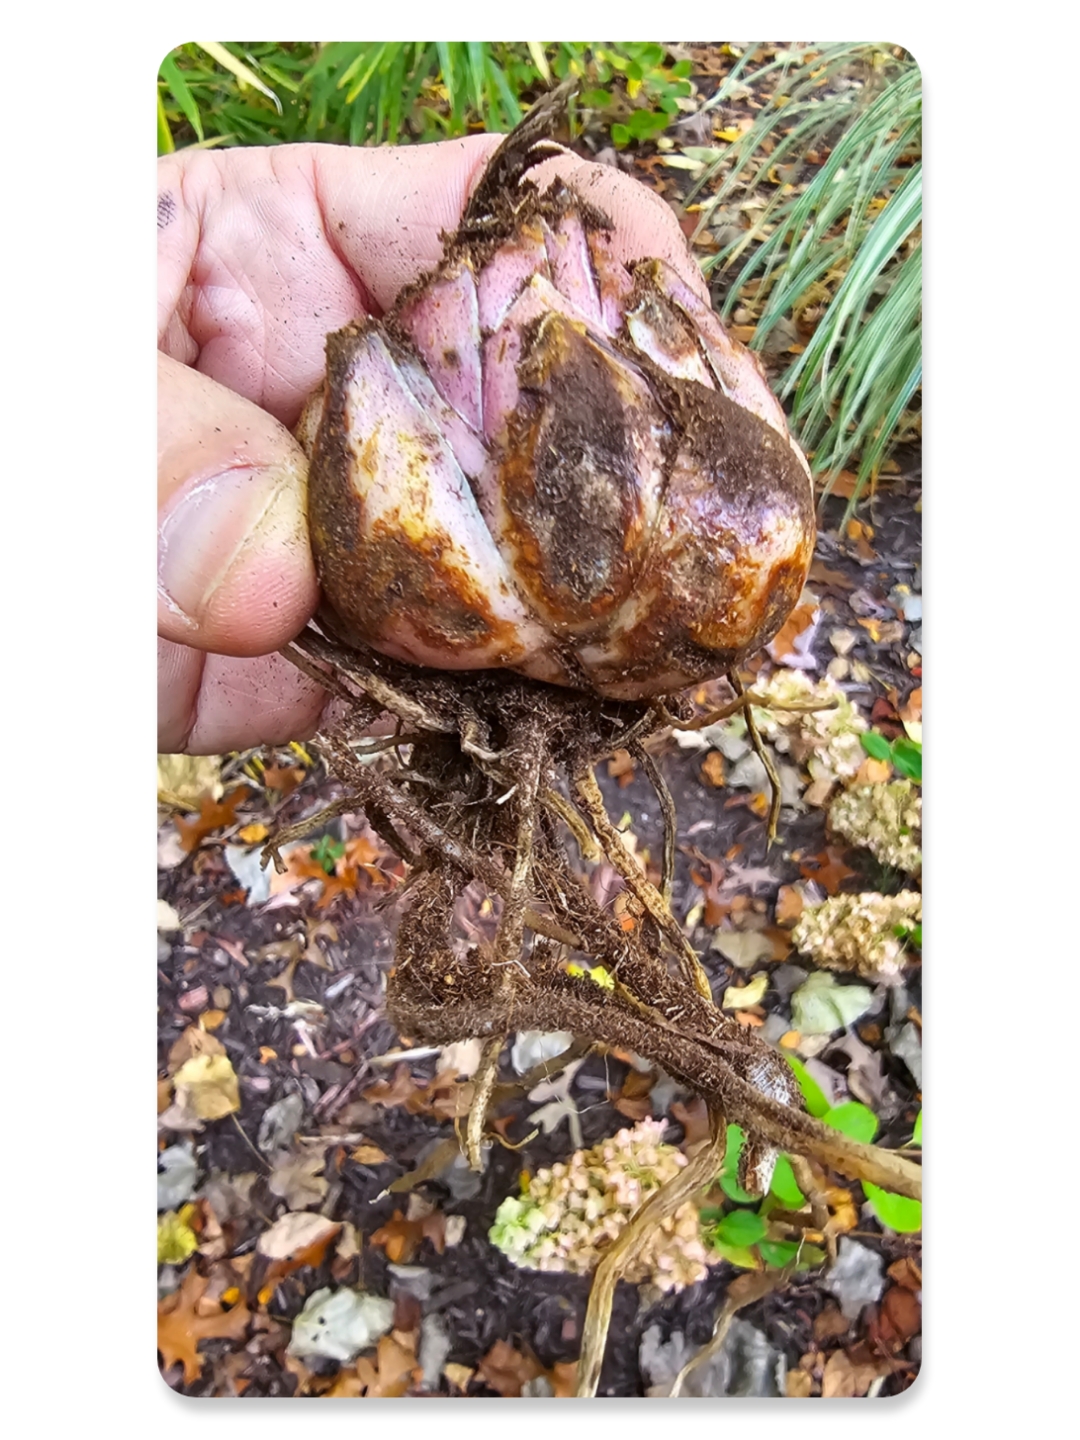
When you’re planting bulbs in the fall (or spring), it’s really important that you plant them in the ground at the right depth for each particular plant variety, and that you orient them in the soil correctly. True plant bulbs are compressed, underground stems that have, to put it simply, a pointy end (top), and a flat, or root end (bottom). As temperatures climb, that compressed stem will expand upward, unfurling leaf scales (as in the case of one of my Oriental lily bulbs pictured here) as it grows and pushes upward and out of the soil, delivering green aerial stem, leaf, and flower growth. And the root, or flat, bottom end, will generate new downward and outward root growth. With this growth dynamic in mind, it’s clear why sticking the bulb in the ground the right way is important. If you’re ever unsure about which end of the bulb is which, plant the bulb on its side.
Note that the lily bulb pictured here is known as a non-tunicate bulb. The outer fleshy scales (seen in this photo) comprise future aerial leaves, and simultaneously help the bulb retain moisture. Lily bulbs are perfect examples of non-tunicate bulbs. Tunicate bulbs, on the other hand, grow in size from the inside out, and they accumulate layers of papery, membranous tunics, with the outermost layer being the oldest and most papery. This outside tunic helps keep this type of bulb from drying out. Examples of tunicate bulbs are those of grape hyacinths, Spanish whitebells, and daffodils.
4. Spanish Whitebells (Hyacinthoides hispanica ‘Alba’)

The basics.
Plant family – Asparagaceae (includes such other genera as Asparagus, Agave, Muscari, Scilla, etc). Height – 8″-12″. Spread – 8″-12″. Light – full sun to mostly shade. Bloom color – bright white. Bloom time – typically mid-late spring in zone 5A/6B. Foliage – deep green, strap-like, and herbaceous, and growing directly from the bulb. Hardiness – zones 3-8. Growth rate – medium growth rate, but prolific naturalizers. Pollinators – bees and butterflies. Toxicity – all parts of the Spanish whitebells plant are acutely toxic. Pest resistance – excellent deer and rodent resistance.
Notes from the field.
Spanish whitebells are a naturalized as well as a cultivated mutation of the more common Spanish bluebells plant. They’re native to the Iberian peninsula, but have been introduced to other parts of the world, including the United States, where they occur in both naturalized and cultivated form. They’re incredibly prolific and are so successful at naturalizing that many countries classify them as invasive. These plants grow from bulbs, and are highly toxic to mammals. They spread assertively by bulb offsets and by self-sowing. My Spanish whitebells grow in an expanding drift in my “Blue and White Hill” planting feature. Although they’re effective naturalizers, they do not seem to spread as aggressively in my garden as do my grape hyacinths. Consequently, when they’ve finished blooming, I allow the plants to drop seed and I do not prune the foliage or stems back when they’re spent and dying back at the end of their growing season (which occurs typically by midsummer). These little plants, with their individual sets of around 15 hanging, bright white “bells” (flowers), and their contrasting beautiful deep green, strap-like foliage, are absolutely beautiful – particularly when growing en masse. The drift of individual plants in my garden grows in my “Blue and White Hill” planting feature in sunlight conditions that range from mostly shade to mostly sun. They seem very happy wherever they happen to be growing. For me, they were a clear choice for my Great Bulbs for Fall Planting Top 5. I love my Spanish whitebells!
Suggestions for planting Spanish whitebells.
Plant Spanish whitebell bulbs as soon as you get them. If you decide to grow Spanish whitebells, you’ll probably be getting them from a reputable online nursery. In this case, you’ll receive your Spanish whitebell bulbs in the fall. As with other bulbs, if you can’t plant them right away, you can store them in your fridge for a few weeks. Plant the bulbs at a depth of about 4″ and spaced around 3″-5″ apart. Once you get them planted, I recommend covering the soil with a 1″ layer of wood chip mulch. Since these plants perform as beautifully in mostly shady conditions as they do in sunnier spots, you’ve got a lot of options for potential planting locations. Mine look really good in the front, outermost border of the planting bed, where they grow along a winding walkway.
Soil. As long as it’s well-drained, soil pH is not terribly important for the general happiness of these plants. The swath of whitebells growing in my garden covers a patch of ground that ranges from slightly acidic to slightly alkaline. Soil composition is not terribly important. As long as their bulbs and roots do not become waterlogged, these plants tolerate soils of varying composition, from sandy and thin, to loamy, to rich and dense.
Water. These plants like moist soils that are well-drained. That being said, they’re amazingly drought tolerant once they’re established. Water them consistently while they’re blooming and growing, especially in their first year.
Pruning and/or deadheading. Nope. Not mine.
Companion planting. My Spanish whitebells grow near a cluster of blue-flowered corydalis, Blue moon phlox, and a large, blue-flowered bigleaf hydrangea. They look great complementing taller plants with flowers of contrasting colors, as well as low-growing neighbors with blooms of darker colors (in the case of my garden, those contrasting flower colors are varying shades of blue).


5. Daffodils (Narcissus)

The basics.
Plant family – Amaryllidaceae (includes such other genera as Allium, Nothoscordum, and Prototulbaghia, etc). Height – 2″-31″. Spread – 6″-12″. Light – full sun to partial shade. Bloom color – various shades of yellow, white, orange, peach, and even green. A daffodil flower’s corona (central, protruding “throat”) and its tepals (petals) can be the same color, or of contrasting colors. Daffodil color combinations are practically limitless. Bloom time – early April – early/mid May in zone 5B/6A. Foliage – rich green linear leaves which (as is the case with the foliage of other tunicate-bulbed plants) grow directly from the bulb. Hardiness – zones 3-8. Growth rate – medium growth rate, but prolific naturalizers. Pollinators – bees and butterflies. Toxicity – all parts of the daffodil plant are toxic to mammals, with the bulb being particularly so. Pest resistance – excellent deer and rodent resistance.
Notes from the field.
No list of great bulbs for fall planting would be complete without daffodils. These plants have, in fact, edged out lilies as my very favorite of all great bulbs for fall planting. Their beauty, longevity, hardiness, and ability to naturalize makes them unbeatable in my book.
The genus Narcissus is an ancient and fairly extensive one. There are estimated to be somewhere between 50 and 60 separate daffodil species, with an unguessable number of unverified hybrids and wild and undocumented varieties. Daffodils first appeared in the Iberian peninsula approximately 24 million years ago.
My modern daffodils have proven to be as hardy as they are beautiful. I grow a couple of different species that have established themselves beautifully in the front gardens/dog park areas of my property. They return reliably year after year, and their floral displays are as dependable as they are gorgeous. My yellow daffs (species unknown) have been blooming and growing in the same spot for nearly 25 years. As these plants are entirely deer and rodent resistant, they require no special protection – whether physical barriers or the application of organic compound repellents. For me, an added bonus to growing daffodils concerns their early emergence and subsequent blooming: I grow my daffodils on the section of my land that’s shaded by mature, leafed-out oak trees from May through October. Because my daffs start doing their thing so early in the spring season, they receive plenty of sunshine as a result of the branches of the surrounding oak trees still being bare. By the time those oaks fully leaf out, my daffs are just about ready to go to sleep for the summer.
The appearance of green daffodil foliage in late winter brings a promise of beautiful April flowers. There are probably some emotional reasons for my consideration of daffodils as maybe the greatest of the great bulbs for fall planting. Their longevity and reliability have made my daffodils not only an intrinsic part of the spring landscape here on my land, but an intrinsic part of my life, as well. They’ve marked both seasons and memories for me, and I love them for it.
Suggestions for planting daffodils.
Plant daffodil bulbs as soon as you get them. If you end up being the proud owner of daffodil bulbs, odds are you’ll have taken title to them in the fall. (Often, nurseries will offer potted, budding/flowering daffodils for sale in the early spring. I’ve never had much luck growing them when I’ve planted them in this condition and at this time. I really do recommend opting for fall-planted bulbs.) As with other dormant bulbs, if you can’t get your daff bulbs in the ground immediately, they’ll keep fine in your fridge for a few weeks. If you can do it, get them in the ground right away.
I plant my daffodil bulbs at a depth of about 6″ and about 10″ apart. Once they’re fully bedded in the soil, I cover the area with about 1″-2″ of wood chip mulch and give them a reasonable amount of water. Then, I let them be.
Soil. Daffodils like soil that’s slightly acidic. Usually a pH somewhere between 6.5 and 7.0 (although these levels work beautifully for my daffs, you can go as low as 6.0 and still keep them happy) is great. They also like soil that’s moist but well-drained. Obviously, a higher moisture level is more important during their growing and blooming period. Because of their membranous tunicate bulbs, they’re able to conserve moisture beautifully. Make sure that their soil is not soggy – particularly while they’re dormant. You’ll kill them if you allow their bulbs to stew in muddy, soggy, poorly-drained soil.
Water. Again, daffodils most appreciate moisture while their aerial structures – foliage and flowers – are doing their thing. Too much moisture will kill the dormant bulbs. A good rule of thumb to keep in mind when it comes to the amount of water dormant bulbs – not just daffs, but all dormant bulbs – is to provide them with what Mother Nature would typically provide them. If you’re in the middle of a major drought at some point over the course of the summer, go ahead and give your dormant daff bulbs enough water to moisten the soil. Repeat this if the drought is extensive. Again, don’t overwater. Remember, those tunicate bulbs have got a natural moisture retention system in place in the form of that outer, papery membrane.
Pruning and/or deadheading. I never cut my daffs back after they’ve become spent and turned yellow and brown (which is usually by late June or very early July here in zone 5B/6A). The plants are toxic, so I don’t worry about any mammalian grazers tugging on that spent foliage and possibly uprooting them. But more importantly, by simply leaving the foliage in place for as long as I do, I’m allowing my daffs to obtain as much sunlight for as long as is absolutely possible, thereby allowing them to manufacture and store as much energy for their future use as is absolutely possible. Remember, those bulbs are energy storehouses.
Companion planting. Although daffodils look great planted with any number of different plants (irises and poppies are two good examples), mine grow in an entirely natural setting, in clumps, by themselves. They seem very happy this way. These really might be the greatest of the great bulbs for fall planting. Seriously. I love these plants.


Well, gang, you’ve got my Top 5 list of great bulbs for fall planting. Each and every plant on this list is beautiful, I think, and they’ve all definitely grown and performed in perfect fashion for me. I heartily recommend every single plant on this list. And speaking of recommendations, I’ve got a few product recs for you. These are my tried and true go-tos, and I’ll never stop offering them to RGG readers as suggestions. I never recommend anything that I don’t believe in.
Espoma Organic Soil Acidifier is the perfect product for lowering the pH and increasing the acidity of your garden’s soil. It’s a fabulous organic product which I’ve used to lower soil pH for plants like my blue hydrangeas and my rhododendrons, azalea, and pieris. And it works perfectly for acidifying the bedding soil of acid-loving bulbs. It’s very effective and allows all acid-loving plants and bulbs to properly access and utilize nutrients from fertilizing products, and from the surrounding soil. Order it here, from Amazon, by clicking the #advertisement link.

Espoma Organic Garden Lime is the perfect product for increasing alkalinity levels in soil. It can be mixed with the bedding soil, or used to top dress soil around plants which are already in the ground. I use this to amend the soil of any of my plants with a preference for alkaline pH levels, like my hellebores. Order this product here, from Amazon, by clicking the #advertisement link.

I bought this Luster Leaf Rapitest 4-way soil analysis meter in February of 2022 and have used it successfully time after time since then to test for soil fertility and pH levels. It also measures sunlight and soil moisture levels. It’s fast, easy to use, convenient, and accurate. By using this device, I’ve been able to determine the necessity of appropriate fertilizer applications and pH amending to the soil of my garden’s perennials. Note that this unit does not test for iron levels in soil. Also note that I really love this little meter! Click the #advertisement link to order it here, directly from Amazon.

For Further Reading
For those of you with an additional interest in planting bulbs in the fall, and the science behind doing it, the following links will take you to some really excellent related articles. I’ve used a number of these sources in my own research for this article.
“Is This a Bulb?” University of Florida Gardening Solutions
“Colchicum autumale.” Missouri Botanical Garden Plant Finder
“Hyacinthoides hispanica.” Wikipedia
“How to Grow and Care for Daffodils.” By Marie Iannotti. The Spruce
Well, my dear readers and subscribers, we’re at the end of another one. I hope you’ve found the info in “5 Great Bulbs for Fall Planting” useful and interesting. The fact that I personally find this particular topic fascinating, and that I love what fall-planted bulbs do for my garden in the spring and summer, made me think that this was a pretty good subject for an article. Plus, being here in the heart of autumn (it’s still a great time to get your bulbs in the ground), it occurred to me that the timing was perfect and that writing this one now would be a total no-brainer. Again, I hope you liked it.
Cheers, and Happy Gardening!

The Renaissance Garden Guy is a participant in the Amazon Associates Program. As an Amazon Associate, The Renaissance Garden Guy earns from qualifying purchases.
Additionally, The Renaissance Garden Guy is a participant in the Bluehost, SeedsNow, and hosting.com (formerly A2 Hosting) affiliate programs. The Renaissance Garden Guy earns a fee/commission each time a visitor clicks on an ad or banner in this site from one of these companies and makes a subsequent qualifying purchase.
Please click here to view The Renaissance Garden Guy Disclosure page.

Glad I finally got to read this! I’m going to try some White bells! I’m thinking they might hold up well in a vase as well as being beautiful in the garden. And I’m glad you included the oriental and asiatic lilies here. In the bulb discussion, they are frequently overlooked. A lot of bang for your buck there!
Thanks for reading this one, Cathy – much appreciated! Definitely try those whitebells. If you’re looking for a shorter-statured plant, I’d opt for the ‘Alba’ variety that I’ve written about here. ‘White City’ is also a great variety, but they tower over the ‘Alba’ variety by several inches. My Albas do spread, but they’re not terribly aggressive. I absolutely love them! If you give them a try, please let me know what you think. I’m in 100% agreement with you on the lily topic. They’re absolutely amazing, and so incredibly long-lived and resilient. Definitely worth the dough! Thanks again, Cathy!
Very informative discussion. Beautiful photos and detailed information given in a your eminently readable style.
I’m so glad you enjoyed the article, Rick. These are definitely “old standbys,” but I think that it’s helpful to those who grow them – or are considering growing them – to know a bit about each plant’s biology and performance attributes. Thank you for reading the article, Rick, and again, I’m happy that you’ve enjoyed it.
Great knowledge, so well explained.
Love the photography, absolutely gorgeous!
Miss summer already 😊🌺
Thank you for reading it, Roxxy, and thank you for your kind words. I really love sticking with these traditional, reliable bulb recommendations. They’re so beautiful, and they never, ever disappoint. Thanks again, Roxxy!
These are 5 great bulbs. There is nothing as exciting as seeing spring bulbs pop up through the ground! Your information is great and your photos are wonderful.
Thank you so much, Kevin. I’m glad you’ve enjoyed the article. I do love these wonderful,reliable bulbs. They’re gorgeous, and I believe they lend a sense of old-fashioned charm to a garden. Thank you again!
Thanks so much for this information-rich piece! I love the photos.
I’m glad you enjoyed the article, Mary. Thank you for giving it a read. There’s nothing like relying on tried and true beauties like these in the fall to help one take credit for a beautiful spring and summer garden. Again, I’m glad you’ve enjoyed it, Mary. Many thanks!